
Available Hints:
Click on a hint sign to see the hint. Click again to hide the hint.
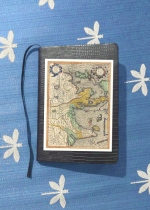
 The title and author of the small book in the book picture are a sort of obscure clue as to how to arrange the cards. The book has no other meaning.The final arrangement of the cards is a very regular shape, but it will have two empty spaces.There are many clues on the cards as to how they should be arranged.
 The 14 cards go in a 4x4 grid with two empty spots. The orange clues and purple clues refer to the two empty spaces.Some cards have direct hints as to how they're arranged. Many of them have symbols which show directions. The symbols are explained on Card #3, marked 'Symbols,' but only two of the symbols' meanings are given. You have to figure out what the other two symbols mean.The pink triangle symbol means NE. That means that if you see a pink triangle followed by a number, then the card with that number must be northeast (i.e. above and to the right) of the card. The blue circle card means WWS. That means two moves west, then a move south, or two cards to the left and one downward in the card grid.
 The card labeled 'THE CODE' shows you how to get the four digits of the solution, if you know what the symbols mean. Digits #1 and #3 have symbols that show a path from the Code card itself, while #2 starts at the purple Void space, and #4 starts at the empty Missing Corner.The green plus symbol means one move North (or up). The red square symbol means ESS, or one move east (right) and two south (down).The grid has 0, 3, Void, and 8 in the top row, 9, Compass, 4, 1 in the second, 5, 2, Photosynthesizers, and sun in the 3rd, and Empty Corner, 6, Code, 7 in the bottom. The first code digit starts at the code card and then goes plus, plus, circle, triangle, plus, which means N N WWS NE N, or up, up, left, left, down, up and right, up. Combined, that's up three to the top row, left one, to card number 3, which is the first digit of the solution. The others are solved in a similar way.